Battery switch on travel trailer function is crucial for managing your RV’s power. Understanding how these switches work, from the simple 1-2-both to more complex systems, is key to preventing electrical problems and ensuring a smooth camping experience. This guide breaks down the different types of switches, explains proper connection and disconnection procedures, and provides troubleshooting tips to keep your power flowing.
We’ll cover everything from the basics of connecting and disconnecting batteries safely to more advanced topics like integrating your battery switch with solar panels and inverters. We’ll also explore preventative maintenance to extend the life of your switch and ensure reliable power whenever you hit the road. Get ready to become a battery switch expert!
Battery Switch and Power Management Systems
Your travel trailer’s battery switch is more than just an on/off switch; it’s a crucial component in a larger power management system. Understanding how it interacts with other systems like solar panels, inverters, and converters is key to maximizing your off-grid power and avoiding costly mistakes. This section will explore the interplay between your battery switch and these other systems, helping you understand different system configurations and choose the right setup for your needs.
The battery switch acts as the central control point for your trailer’s battery power. It allows you to isolate your house batteries from the chassis battery (usually used for starting your tow vehicle), preventing accidental drain. However, its role expands significantly when integrated with other power management components. For example, a properly configured system allows solar panels to charge your house batteries directly, even when the switch is off.
So, you’re hitting the road in your travel trailer? Awesome! First things first: make sure you understand the battery switch on travel trailer function – it’s crucial for keeping your lights and appliances running. Once you’ve got that sorted, it’s time to think about entertainment. For the serious music lover, check out this guide on setting up an audiophile travel aetup to enjoy your favorite tunes on the open road.
Proper power management and great sound – that’s the recipe for a killer road trip!
This prevents the need to constantly monitor and switch things on and off. The inverter, which converts DC battery power to AC household power, is also typically connected downstream of the battery switch, drawing power only when the switch is in the appropriate position. Finally, the converter, which transforms 12V DC power from the battery into 120V AC power for some appliances, usually operates continuously but benefits from a properly managed battery supply.
Power Management System Configurations and Their Impact on Battery Usage
Different power management systems offer varying levels of complexity and control. A simple system might involve only a battery switch, a converter, and a single battery bank. This setup is straightforward but offers limited control over power flow and battery charging. More sophisticated systems incorporate solar charge controllers, battery monitors, and sophisticated inverters with built-in charging capabilities. These allow for automatic charging from various sources (solar, shore power, alternator) and optimized battery usage.
So, you’re hitting the road in your travel trailer? Awesome! First things first: make sure you understand your battery switch on travel trailer function – it’s crucial for keeping your lights and appliances running. Once you’ve got that sorted, think about your entertainment. For the serious music lover, setting up an audiophile travel aetup can seriously elevate your road trip experience.
Proper power management and great sound – that’s the recipe for a perfect adventure!
For instance, a system with a smart charge controller and a battery monitor can prioritize charging from solar power during the day and automatically switch to shore power at night, ensuring optimal battery life and minimizing energy waste. Conversely, a simple system may lead to faster battery drain if not managed carefully, especially during extended off-grid use. The choice depends on your power needs, budget, and technical expertise.
Factors to Consider When Choosing a Battery Switch and Power Management System
Choosing the right system involves several key considerations.
Before outlining the factors, it’s important to understand that selecting the correct components is crucial for safety and optimal performance. A poorly designed or improperly installed system can lead to damage to your equipment or even pose a fire hazard.
- Amperage Capacity: The battery switch and all other components (charge controllers, inverters, converters) must be rated for the amperage your system demands. Underestimating this can lead to overheating and failure.
- Number of Batteries: The number of batteries you need depends on your power consumption and the duration of your off-grid stays. A larger battery bank provides more capacity but also increases the cost and weight.
- Type of Batteries: Different battery chemistries (lead-acid, lithium-ion) have varying characteristics in terms of lifespan, charging requirements, and cost. Choosing the right battery type is essential for optimal performance and longevity.
- Solar Panel Capacity: If you plan to use solar panels, their wattage and the capacity of the charge controller must be matched to your battery bank’s capacity and charging requirements.
- Inverter Capacity: The inverter’s wattage rating determines the amount of AC power it can provide. Choose an inverter that can handle the peak power demands of your appliances.
- Budget: Power management systems range in price from relatively inexpensive basic setups to highly sophisticated and expensive systems with advanced features.
- Technical Expertise: Some systems are simpler to install and manage than others. Consider your own technical skills and whether you need professional help for installation.
Battery Switch Location and Installation
Finding the right spot for your battery switch in your travel trailer is crucial for easy access and safety. Generally, you want it easily reachable but also protected from the elements and potential damage. Proper installation is key to ensuring reliable power and preventing electrical hazards.The typical location for a battery switch in a travel trailer is inside a readily accessible compartment, often near the batteries themselves but in a dry, well-ventilated area.
This placement prioritizes safety by minimizing the risk of accidental contact with the switch while simultaneously allowing quick access for disconnecting the batteries in emergencies or during storage. Placement in a compartment also protects the switch from moisture, dust, and potential impacts. Avoid areas prone to extreme temperatures or direct sunlight.
Battery Switch Installation Process
Installing a battery switch involves careful wiring and secure mounting. Incorrect installation can lead to electrical problems or even fire hazards. The process requires basic electrical knowledge and the right tools. Always disconnect the battery negative terminal before beginning any wiring work.
- Gather Tools and Materials: You’ll need a battery switch (appropriate for the amperage of your battery system), appropriately sized wiring, wire connectors, a wrench or socket set, a drill with appropriate drill bits (if needed), a screwdriver, wire strippers/cutters, electrical tape, and safety glasses.
- Choose Mounting Location: Select a suitable location, considering accessibility, protection from the elements, and proximity to the battery(ies). Ensure the location is easily reachable but out of the way of other components.
- Mount the Switch: Securely mount the battery switch to a stable surface using appropriate screws or bolts. Ensure the switch is firmly attached and won’t vibrate loose during travel.
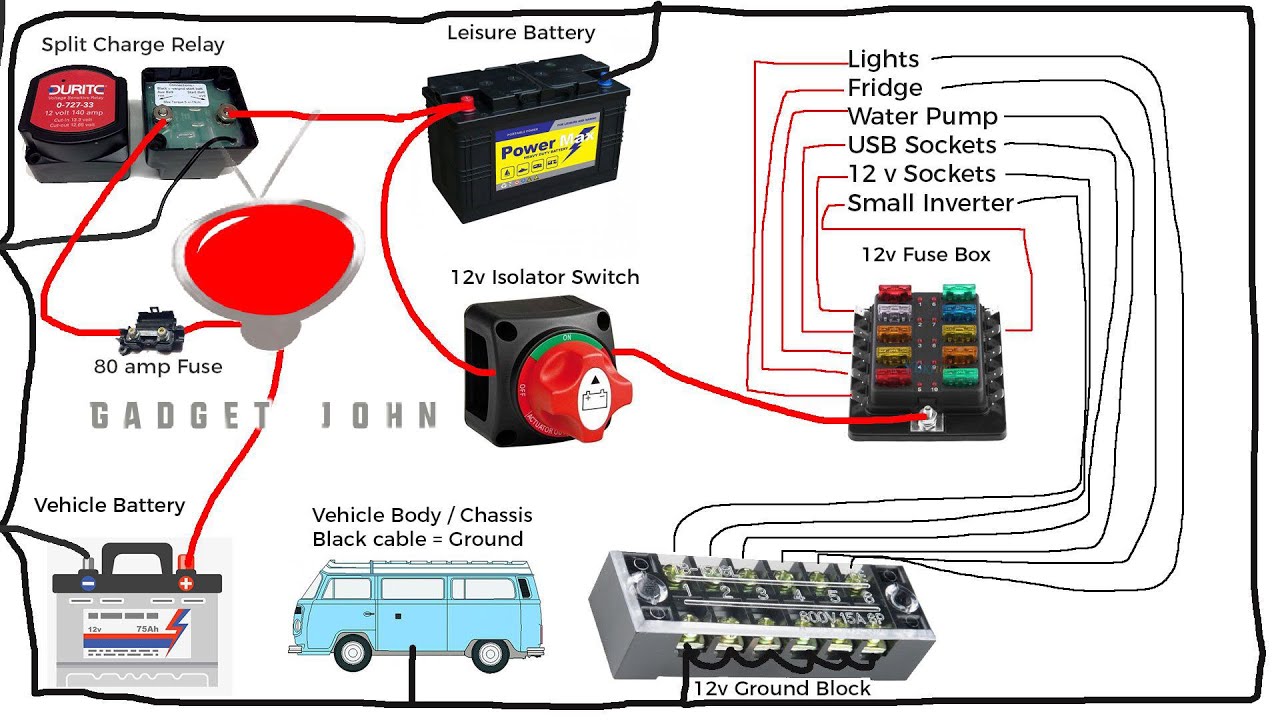
- Wire the Switch: This step requires careful attention to detail. Connect the positive (+) cable from your battery to the “battery” terminal on the switch. Then, run a new cable from the “load” terminal of the switch to your power distribution center or other electrical components. This is your switched power line. Grounding the switch to the trailer’s chassis is also important for safety.
The exact wiring configuration will depend on your specific switch and trailer’s electrical system. A simple example could involve a single battery and a single load, but more complex systems may require multiple batteries and more elaborate wiring.
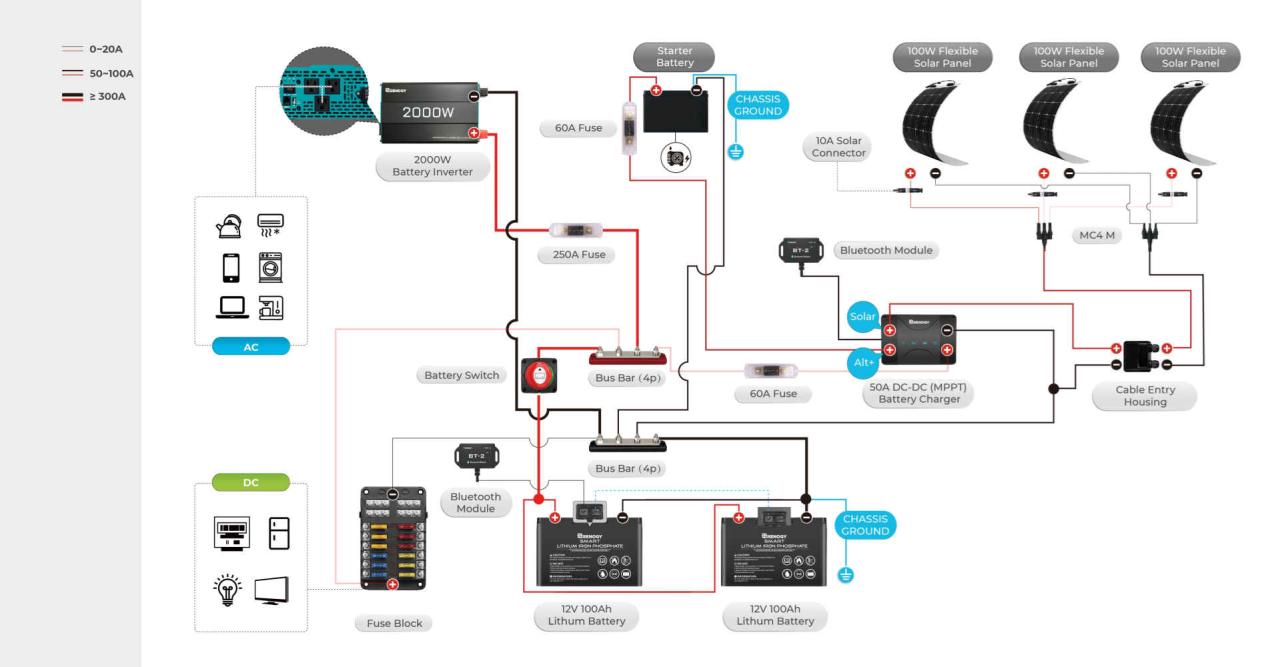
- Diagram Example (Simple System): Imagine a single 12V battery. The positive (+) cable from the battery goes to the “battery” terminal on the switch. A wire from the “load” terminal on the switch runs to the positive input of your power distribution center. A separate ground wire runs from the chassis of the switch to the negative (-) battery terminal or to a suitable chassis ground point.
- Test the Switch: After wiring, carefully reconnect the negative (-) battery terminal. Test the switch to ensure it correctly disconnects and reconnects power to your trailer’s systems. If you don’t have experience working with electrical systems, it’s advisable to seek professional help.
Wiring Diagram Example (Simplified), Battery switch on travel trailer function
A simplified diagram might show a battery (+) terminal connected to the “battery” input of the switch, a wire from the “load” output of the switch going to the positive input of a fuse box or distribution panel, and a ground wire connecting the switch chassis to the negative (-) battery terminal or a ground point on the trailer frame.
This is a very basic example, and more complex systems would require more detailed diagrams. Remember, this is a simplification and should not be used as a substitute for consulting a qualified electrician or the specific wiring diagram for your battery switch and trailer setup. Always prioritize safety and consult professional advice if needed.
Mastering your travel trailer’s battery switch is more than just flipping a lever; it’s about understanding your RV’s electrical system and ensuring safe and reliable power. By understanding the different switch types, practicing safe handling procedures, and performing regular maintenance, you’ll keep your trailer running smoothly and your adventures powered up. So, get out there and enjoy the open road, knowing you’ve got the power under control!
Commonly Asked Questions: Battery Switch On Travel Trailer Function
What happens if I leave my battery switch in the “off” position?
Leaving the switch off completely disconnects your house batteries from the trailer’s electrical system, preventing power drain and protecting your batteries from discharge. However, you’ll have no power to your appliances or lights.
How often should I inspect my battery switch?
Inspect your battery switch at least once a year, or more often if you notice any unusual smells, sounds, or performance issues. Look for corrosion and ensure all connections are tight.
Can I use any type of battery switch in my travel trailer?
No, the correct switch depends on your trailer’s wiring and battery configuration. Consult your owner’s manual or a qualified RV technician to determine the appropriate switch type and amperage.
My battery switch is sparking – what should I do?
Sparking indicates a serious electrical problem. Immediately disconnect the batteries, turn off the power, and contact a qualified RV technician or electrician for repair. Do not attempt to repair this yourself.
